Cleaning up Forest River Build Quality / HVAC Ducting

ctechbob

Well-known member
I'm not shocked, or complaining, but should you decide to purchase a new RV these are the types of things you can expect to run into.

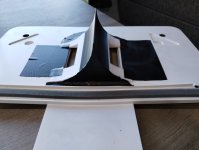
Started pulling the lower portion of my AC unit apart to get ready for installing a heat coil/control box. The duct taping of the area was particularly poorly done, lots of open holes for air to escape and jagged edges to create turbulence.

This is before I tied the wires up neatly and retaped the area:

IMG_20231026_223030602.jpg


To be fair, I did some of this while I was taking the old box out. I knew I was going to replace the tape, so I wasn't nice to it. But you can see on the left and right sides that it was just thrown up there.

IMG_20231026_224121979.jpg


After, I actually had some super sticky butyl rubber tape that I used in some places since it is more flexible and sticks to EVERYTHING. It is supposed to be for waterproofing things, but it worked well in this application. Then I laid some aluminum tape over it in spots. I also tied the wires up with wire ties fastened to the wood underneath so they can't pull down on the tape.


IMG_20231026_231652761.jpg


Smoothed the tape into the ductwork and sealed it up, there's one on either side.


IMG_20231026_231655339_HDR.jpg


The keen observer might notice there's a bolt missing on the right side of this picture. It was completely loose when I pulled the shroud down, so I removed it while I was taping things. It got reinstalled with Loctite. The other 3 got the same treatment, hopefully, that will keep them all secure. I'm glad I pulled it apart. That loose corner could have easily led to water intrusion or worse.


IMG_20231026_231701690_HDR.jpg


So, welcome to RV ownership. I know I don't own anything near top-of-the-line, but this is the work quality you can expect out of pretty much anything industy-wide.

Bonus picture. The wiring behind the radio/control panel/thermostat: (They are nice enough to use multi-conductor wire for their HVAC wiring, I didn't have to do anything except connect to one of the unused wires to add control for my electric heat coil.

IMG_20231026_223022698_HDR.jpg
 
Last edited:
yeah. they are all like that. it doesn't seem to matter if it is low end RV or the top shelf luxo label,
you get behind the panels and say wow. wiring by Lucas, the Prince of Darkness. :)

have you pulled the bottom off the RV yet? :)

one other thing to say about build quality on my Bighorn, which was manufactured in 2017.. and I purchased 2 years ago
was I was checking the tires under the slide while in Anchorage and I noticed an electrical box dangling.
it was a household type 110 volt junction block. it was not attached to the frame of the trailer like it's mate.

First thought was the screws had fallen out.. but the more I looked the more I realized it had never been screwed to the frame rail
I suspect they glued it on..
so I ended up attaching the electrical box to the frame rail in a parking lot in Anchorage.
it's always something. If you are lucky you find it before it causes damage.
 
Our Airstream had fairly neatly done wiring, but there were a few places that left a lot to be desired. Our New Horizons 5th wheel's wiring is artwork. I know the guy at the factory that is in charge of all things electrical. He insists his workers take the time to do things correctly and neatly. I'll take some pictures.
 
Yep, I've ordered some terminal strips and I'll probably go a little overboard cleaning up behind that radio. The wire nut has to go at least. Might not be the kind of work I'm used to doing, but it will be better. Probably ditch some of the Wago's as well.
 
@ctechbob, I think the same guy did the work on the ductwork in our Grand Design. I spent an afternoon getting the wiring tidied up and out of the airflow and making smooth transitions from the plenum area to the duct outlets. Definitely more airflow out of the vents now. I noticed the ductwork from the furnace that runs at the back of the lower cabinets is partly crushed but haven't been able to deal with that yet. Our trailer is a 2017 that we bought from the original owner in 12/20 who wasn't a longtime RV guy and used it very little. I'm still sorting out manufacturing defects as I find them.
 
@ctechbob, I think the same guy did the work on the ductwork in our Grand Design. I spent an afternoon getting the wiring tidied up and out of the airflow and making smooth transitions from the plenum area to the duct outlets. Definitely more airflow out of the vents now. I noticed the ductwork from the furnace that runs at the back of the lower cabinets is partly crushed but haven't been able to deal with that yet. Our trailer is a 2017 that we bought from the original owner in 12/20 who wasn't a longtime RV guy and used it very little. I'm still sorting out manufacturing defects as I find them.

@Azjeff I hope you have better luck with your Grand Design than I did with mine..
mine the rubber roof failed and the sidewalls were plagued with Delamination..
I never had any issues with the accessories not working in the trailer,like the AC, or the slides etc..
but it was fallin apart. I bought trailer new, it was a 2015 GD Reflection 317RST.

best thing ever happened to it was a brush fire. :)
 
Here's the After of the thermostat wiring. I still have the mass of ground wires to clean up in the area, but that has to wait until daytime since I need to completely depower the trailer since I didn't want to work in the dark. I also need to add two mounted wire ties to the thermostat wires to keep them from flexing and breaking over time.

IMG_20231031_010802203.webp
 
The t-stat wires have been secured and the giant blue wire nut has been consigned to the trash. Replaced with a grounding strip. Still not super pretty, but at least there's not a piece of wire so short that it is pulling out of the terminal attached to the control box.

But now the old car audio installer in me has been triggered. Forest River makes a big deal about the audio system in these trailers. They even have an 8" subwoofer in the ceiling. It sounds like crap, and now I know why.

The 2 - 2 way speakers and the 8" subwoofer are just wired to the left zone 1 channel of the radio. They didn't even bother to wire them in stereo and maybe use a dual voice coil subwoofer. They just run one wire and flip the switch on the radio to 'mono' and roll with it and run all 3 speakers.

*sigh*

I might fix the inside speakers, but the two outside are wired the same way and I'm not pulling new wire through the wall.


IMG_20231103_151449089.webp


IMG_20231103_150835838.webp
 
The t-stat wires have been secured and the giant blue wire nut has been consigned to the trash. Replaced with a grounding strip.
That looks so much better and less trouble prone in the future. Give yourself a high-five!

The 2 - 2 way speakers and the 8" subwoofer are just wired to the left zone 1 channel of the radio. They didn't even bother to wire them in stereo and maybe use a dual voice coil subwoofer. They just run one wire and flip the switch on the radio to 'mono' and roll with it and run all 3 speakers.
There is no excuse for this kind of sloppiness. Just think about how many trailers must be out there with garbage stereo wiring. This kind of crap would make me call the home office and complain. Not that you'd probably get anything out of them, but maybe they would wire stereos properly.
 
I might have gone a little overboard. I 3d printed some guides to go inside the discharge side of the plenum. There was a design online, but I had to completely redesign the lower piece since the online one didn't provide for the dumps straight off of the air handler.

I don't think this made as big of a difference in airflow, but the whole system is a tiny bit quieter when it is running on high.

Lower section to get the air turned sideways into the ducts. Cutouts are for the dumps directly off the air handler.

IMG_20231104_102832050.jpg


Forgot to turn the flash on and was in a hurry.

Matching curve into the ducts from above.

IMG_20231104_102816551_HDR.jpg

IMG_20231104_102832050.jpg
 

Attachments

  • IMG_20231104_102832050.webp
    IMG_20231104_102832050.webp
    59.7 KB · Views: 4
Last edited by a moderator:
Back
Top